
LPI ,Liquid Penetrant Testing
Principle
Penetrant solution is applied to the surface of a component. The liquid is pulled into surface-breaking defects by capillary action. Excess Penetrant material is carefully cleaned from the surface. A developer is applied to pull the trapped Penetrant back to the surface. Where it is spread out and forms an indication.
Main Uses
Used to locate cracks, porosity, and other defects that break the surface of a material and have enough volume to trap and hold the Penetrant material. Liquid Penetrant testing is used to inspect large areas very efficiently and will work on most nonporous materials.
Main Advantages
Large surface areas or large volumes of parts/materials can be inspected rapidly and at low cost. Parts with complex geometry. Indications are produced directly on the surface of the part providing a visual image of the discontinuity. Equipment investment is minimal.
Disadvantages
Detects only surface breaking defects. Surface preparation is critical as contaminants can mask defects. Requires a relatively smooth and nonporous surface. Post cleaning is necessary to remove chemicals. Chemical handling precautions are necessary(toxicity, fire, waste)
Click here to move up
MPI , Magnetic Particle Testing
Principle
A Magnetic field is established in a component from ferromagnetic material. Defects such as cracks or voids cannot support as much flux, and force some of the flux outside of the part. Magnetic particles distributed over the component will be attracted to areas of flux leakage and produce a visible indication.
Main Uses
Used to inspect ferromagnetic materials (those that can be magnetized) for defects that result in a transition in the magnetic permeability of a material. Magnetic particle inspection can detect surface and near surface defects.
Main Advantages
Large surface areas of complex parts can be inspected rapidly. Can detect surface and subsurface flaws. Magnetic particle indications are produced directly on the surface of the part and form an image of the discontinuity. Equipment costs are relatively low.
Disadvantages
Only ferromagnetic materials can be inspected. Proper alignment of magnetic field and defect is critical. Requires relatively smooth surface. Paint or other nonmagnetic coverings adversely affect sensitivity. Demagnetization is usually necessary
Click here to move up
UT , Ultrasound Testing
Principle
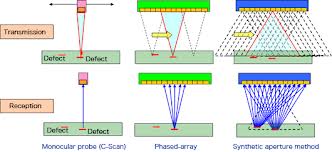
High frequency sound waves are sent into a material by use of a transducer. The amount of energy transmitted or received and the time the energy is received are analyzed to determine the presence of flaws. Changes in material thickness and changes in material properties can also be measured.
Main Uses
Used to locate surface and subsurface defects in many materials including metals, plastics, and wood. Ultrasonic inspection is also used to measure thickness of materials and otherwise characterize properties of material based on sound velocity and attenuation measurements.
Main Advantages
Depth of penetration for flaw detection or measurement is superior to other methods. Only single sided access is required. Provides distance information. Minimum part preparation is required.
Disadvantages
Surface must be accessible to probe and couplant. Surface finish and roughness can interfere with inspection. Thin parts may be difficult to inspect. Linear defects oriented parallel to the sound beam can go undetected. Reference standards are often needed Click here to move up
RT , Radiographic Testing
Principle
X-rays are used to produce images of objects using film. The test object is placed between the radiation source and detector. The thickness and the density of the material that X-rays must penetrate affect the amount of radiation reaching the detector. This variation in radiation produces an image on the detector that often shows internal features of the test object.
Main Uses
Used to inspect almost any material for surface and subsurface defects. X-rays can also be used to locate and measure internal features, confirm the location of hidden parts in an assembly, and to measure thickness of materials.
Main Advantages
Can be used to inspect virtually all materials. Detects surface and subsurface defects. Ability to inspect complex shapes and multi-layered structures without disassembly. Minimum part preparation is required.
Disadvantages
Access to both sides of the structure is usually required. Orientation of the radiation beam to non-volumetric defects is critical. Field inspection of thick section can be time consuming. Relatively expensive equipment is required. Possible radiation hazard for personnel.
Click here to move up
ET , Eddy Current
Principle
Alternating electrical current is passed through a coil producing a magnetic field. When the coil is placed near a conductive material the changing magnetic field induces current flow in the material. Eddy current produce their own magnetic field that can be measured and used to find flaws and characterize conductivity, permeability, and dimensional features.
Main Uses
Used to detect surface and near-surface flaws in conductive materials. It is also used to sort materials, based on electrical conductivity and magnetic permeability, and also measure the thickness of thin sheets of metal and nonconductive coatings such as paint.
Main Advantages
Detects surface and near surface defects. Test probe does not need to contact the part. Method can be used for more than flaw detection. Minimum part preparation is required.
Disadvantages
Only conductive materials can be inspected. Ferromagnetic materials require special treatment to address magnetic permeability. Depth of penetration is limited. Flaws that lie parallel to the inspection probe coil winding direction can go undetected
Click here to move up
For Comment
To send inquiries, including feedback, and questions regarding public relations, services or markets, you can use our Feedback and Inquiries email below. All inquiries will be directed to the Business Development Team ,mail us to mr_mohammad@hotmail.ca
Please click to send us comment
Click here to move up

